Real time DevOps Project - Building 3 tier High Availability Application Architecture using Terraform in AWS


Hello everyone, today we are going to deploy an actual Production/ Industry level 3 tier application in AWS using the IAC tool Terraform.
Project Details:
We are going to deploy a three-tier application architecture in AWS cloud platform using Infrastructure as Code tool - Terraform.
Why Terraform? - We can deploy manually from the AWS console by creating every component one at a time, but what we do here, we will write code that will deploy the whole infrastructure in just a few clicks, and Terraform will help us in that.
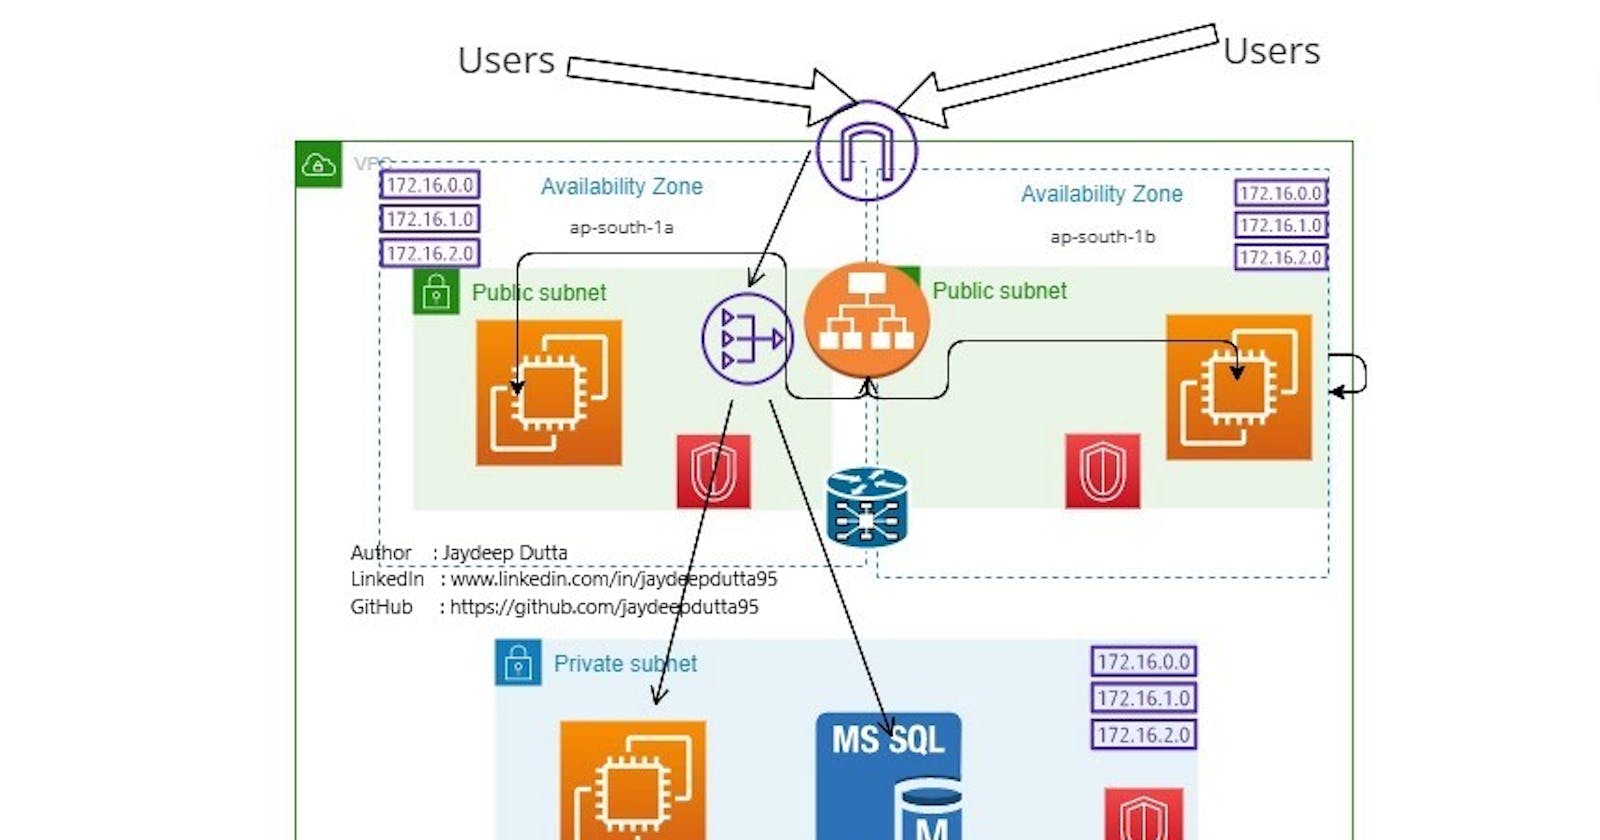
What We will Deploy? - We will deploy
one VPC
two Public Subnets and One Private subnet
2 EC2 Instances in Public Subnets with two AV Zones with preinstalled Apache webserver.
1 EC2 instance in Private subnet as DB Instance.
Security Group for Ingress and Egress permissions
Load Balancer and LB Target and Listener
1 Customed Route Table, and modify the Default RTB
Internet Gateway and NAT Gateway
Project Diagram as follows

Prerequisites & Project Link -
Prerequisites -
AWS Account
Terraform installed in the local system
AWS CLI installed in the Local system
Knowledge of AWS VPC, EC2, Linux, Terraform
GitHub Link - https://github.com/jaydeepdutta95/Terraform-Project---building-3-tier-app-Infrastructre.git
Steps:
Configure local AWS CLI - with your AWS Account user access and Secret access keys.
Building Terraform Code - for 3-tier application.
Create a VPC with Subnets
Create a Security Group for VPC and EC2 instances
Creating the Servers
Create the Internet and NAT gateways
Create the Application Load balancer and its dependencies.
Create the Customize route table and its dependencies.
Deploying the Infra in AWS
Validation and Configuration of the Deployment in AWS
Verification of Deployments
Verification of Servers SSH log in
Installing MySQL DB in DB instance
Destroying the whole infra
Step 1: Configure AWS CLI
let's configure the AWS CLI in our locally with user Acess and Secret access keys.
Why ? - It's another method to authenticate terraform from AWS CLI, rather than to provide all secret keys under Terraform
Steps:
Create a User with Administrative Access ( Limit the access in real-world cases) in the IAM section of AWS Console.
Save the Access and Secret Access key in local
in CMD terminal type AWS Configure as below and put the value & the default region and output format(JSON or None)as shown in below

Now your System is ready to talk to the AWS console without going there in the console. if we did this then in Terraform code we dont have to provide the Keys to authenticate.
(Follow step 1 in the above link)
Step 2: Building Infrastructure Code
First, create a provider.tf file and write as below in it.
 #Author    : Jaydeep Dutta
 #LinkedIn   : www.linkedin.com/in/jaydeepdutta95
 #GitHub     : https://github.com/jaydeepdutta95
 #Hashnode   : https://jaydeep2022.hashnode.dev/
 ########################################################

 terraform {
   required_providers {
     aws = {
       source  = "hashicorp/aws"
       version = "4.20.1"
     }
   }
 }
 provider "aws" {
   region = var.region
 }
next, we will create a VPC.tf VPC with Subnets, and code as follows.
 # Author    : Jaydeep Dutta
 #LinkedIn   : www.linkedin.com/in/jaydeepdutta95
 #GitHub     : https://github.com/jaydeepdutta95
 #Hashnode   : https://jaydeep2022.hashnode.dev/
 ########################################################
 resource "aws_vpc" "main" {
   cidr_block = "10.0.0.0/16"

   tags = {
     Name = "CustomVPC"
   }
 }
 resource "aws_subnet" "public" {
   count             = 2
   vpc_id            = aws_vpc.main.id
   cidr_block        = var.cidr[count.index]
   availability_zone = var.az[count.index]
   tags = {
     Name = "jay-public-subnet"
   }
 }
 resource "aws_subnet" "private" {
   vpc_id            = aws_vpc.main.id
   cidr_block        = "10.0.3.0/24"
   availability_zone = "ap-south-1b"

   tags = {
     Name = "jay-private-subnet"
   }
 }

 data "aws_subnets" "sid" {
   filter {
     name   = "vpc-id"
     values = [aws_vpc.main.id]
   }
   tags = {
     Tier = "Public"
   }
 }
next, we will create servers.tf and we will write as below:
we will create 2 web servers with preinstalled Apache and 1 DB server.
and we will copy the pem file in the DB server using Terraform Provisioner.
    #Author     : Jaydeep Dutta
    #LinkedIn   : www.linkedin.com/in/jaydeepdutta95
    #GitHub     : https://github.com/jaydeepdutta95
    #Hashnode   : https://jaydeep2022.hashnode.dev/
    ########################################################

      resource "aws_instance" "web" {
        ami                         = var.ec2_ami
        instance_type               = var.instance_type
        key_name                    = "jaydeep1387"
        subnet_id                   = aws_subnet.public[count.index].id
        vpc_security_group_ids      = [aws_security_group.allow_tls.id]
        associate_public_ip_address = true
        count                       = 2

        user_data = <<-EOF
            #!/bin/bash
              sudo yum update -y
              sudo yum install -y httpd.x86_64
              sudo systemctl start httpd.service
              sudo systemctl enable httpd.service
              echo “Welcome and Learn with Jaydeep from $(hostname -f)” > /var/www/html/index.html
            EOF

        tags = {
          Name = "Web_Server_${count.index}"
        }

        provisioner "file" {
          source      = "./jaydeep1387.pem"
          destination = "/home/ec2-user/jaydeep1387.pem"

          connection {
            type        = "ssh"
            host        = self.public_ip
            user        = "ec2-user"
            private_key = file("./jaydeep1387.pem")
          }
        }
      }

      resource "aws_instance" "db" {
        ami                    = var.ec2_ami
        instance_type          = var.instance_type
        key_name               = "jaydeep1387"
        subnet_id              = aws_subnet.private.id
        vpc_security_group_ids = [aws_security_group.allow_tls_db.id]

        tags = {
          Name = "Database_server"
        }
      }
Next, we will create a Security Group file as securitygroup.tf and will write as below.
#Author     : Jaydeep Dutta
#LinkedIn   : www.linkedin.com/in/jaydeepdutta95
#GitHub     : https://github.com/jaydeepdutta95
#Hashnode   : https://jaydeep2022.hashnode.dev/
########################################################

resource "aws_security_group" "allow_tls" {
  name        = "allow_tls"
  description = "Allow TLS inbound traffic"
  vpc_id      = aws_vpc.main.id

  ingress {
    description = "TLS from VPC"
    from_port   = 22
    to_port     = 22
    protocol    = "tcp"
    cidr_blocks = ["0.0.0.0/0"]
  }

  ingress {
    description = "TLS from VPC"
    from_port   = 80
    to_port     = 80
    protocol    = "tcp"
    cidr_blocks = ["0.0.0.0/0"]
  }

  egress {
    from_port   = 0
    to_port     = 0
    protocol    = "-1"
    cidr_blocks = ["0.0.0.0/0"]
  }

  tags = {
    Name = "allow_tls"
  }
}

resource "aws_security_group" "allow_tls_db" {
  name        = "allow_tls_db"
  description = "Allow TLS inbound traffic"
  vpc_id      = aws_vpc.main.id

  ingress {
    description = "TLS from VPC"
    from_port   = 22
    to_port     = 22
    protocol    = "tcp"
    cidr_blocks = ["0.0.0.0/0"]
  }

  ingress {
    description = "TLS from VPC"
    from_port   = 3306
    to_port     = 3306
    protocol    = "tcp"
    cidr_blocks = ["0.0.0.0/0"]
  }

  egress {
    from_port   = 0
    to_port     = 0
    protocol    = "-1"
    cidr_blocks = ["0.0.0.0/0"]
  }

  tags = {
    Name = "allow_tls_db"
  }
}
And next we will create networking.tf and will write code for the Internet Gateway, NAT Gateway, EIP, Load balancer, Load Balancer target group and its listener, Route Table and its Association,
Load balancer is required to balance the traffic between Web Servers. for that we will also require Load balancer target group, LB Target group attachment and Listener (type Foward) to listen in port 80 for all HTTP traffics.
We also require an Internet gateway to connect EC2 with the public internet via a Customized route table.
We need NAT gateway to provide internet incoming connection to private DB server through private subnet.
Fork my repo for more details and I am writing code here all are mentioned in my Github project link (Mentioned earlier)
- Next we will have create the variables.tf file and put the varibales in that.
Step 3: Deployment in AWS
Next we will Initialize terraform and apply the whole infra in AWS using below command one by one.
terraform init
terraform fmt
terraform validate

terraform plan

terraform apply --auto-approve
Step 4 : Configuration &Validation.
in this stage we will go to the AWS console and will check if our deployment is successful or not. and also
we will configure the DB server by installing MySQL in this and will try to connect DB server from one of the web server.
We will check the Load balancer URL is working fine with 2 instances or not.
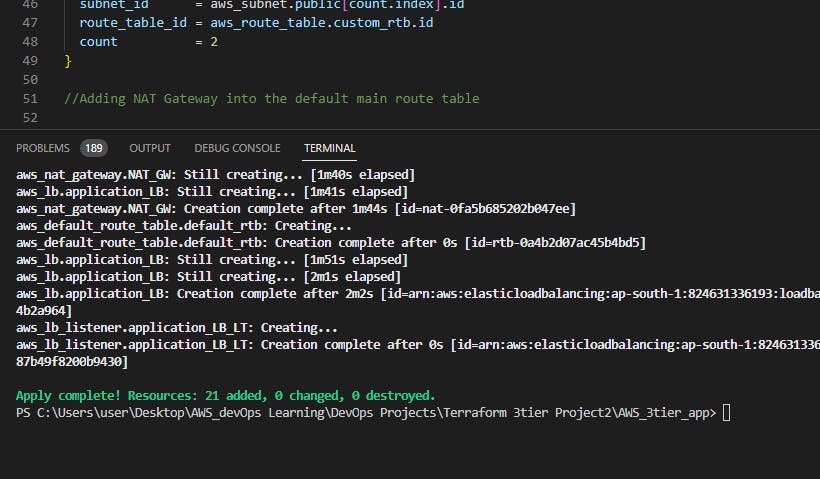
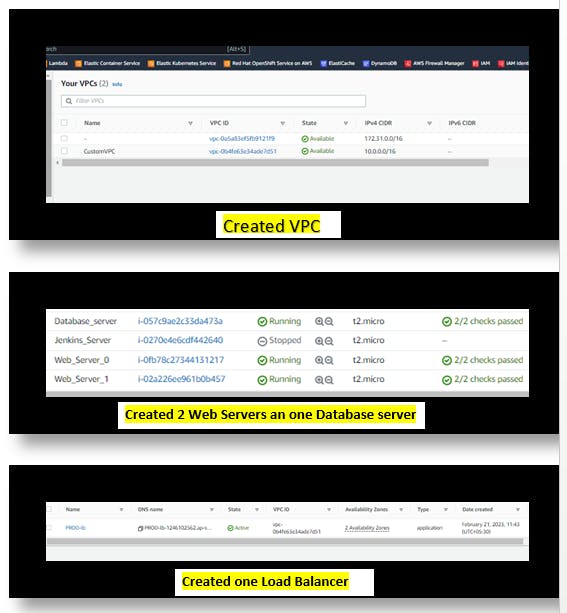
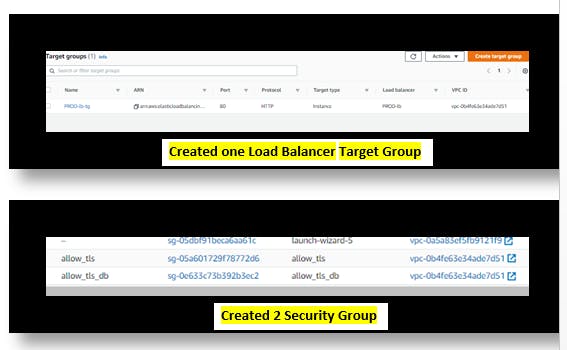
So I am hoping by now we have successfully deployed infra in AWS as shown below
We will now go to AWS console and check & validate resources that we have created as below:

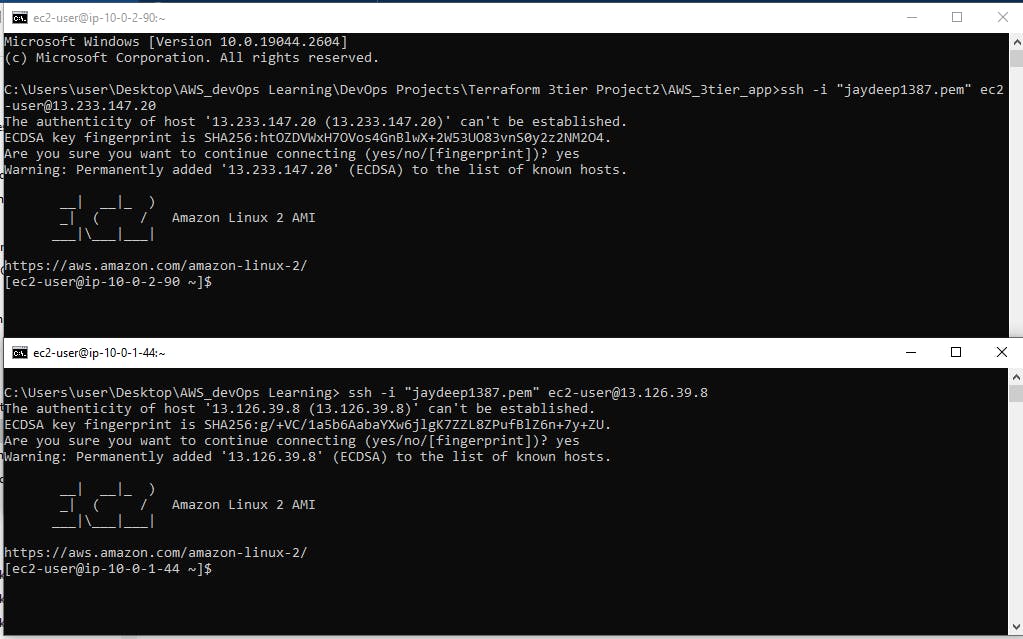
Now we will try to connect our webservers via SSH thorugh the Certificate key ( PEM file).
Note - And now we will try to connect to DB server via any one Web server for that we need the PEM Certificate key to be permitted with execution permission
and in any one server we will change the File permission as 400 by
chmod 400 and then we will SSH like
ssh -i "your-pemffile-name.pem" ec2-user@10.0.3.41
after that we will check the internet connection and will try to install MySQL engine

Now its getting conneted and we will now install mysql in DB server to check Internent Connection as below.

We are done almost now we will check if our Load balancer is working fine or not.
for that, we will take the load balancer DNS URL and hit it from browser and we can see it will come up with a different hostname on every click of the refresh button . as our HTML file contains like
echo “Welcome and Learn with Jaydeep from $(hostname -f)” > /var/www/html/index.html


See here there two IP s are getting shown here. that means our Application load balancer is working fine.
Step 4: Destroying the whole infra
Its always been a good practice to delete the whole stack of Infra or resources that we have created for our project purpose otherwise it will increase the bill.
We can do it manually but we will do it via one command - terraform destroy

So all 21 resources have been deleted.
Conclusion -
So here we have completed another real-time DevOps Project with Terraform and
modification you can do -
You can add a Remote backend to S3 as a
terraform backendblock.You can add another set of Private subnets to isolate DB and App servers.
So I am hoping you have liked my project and effort, please leave a review that will motivate me to build more projects and also fork my GitHub Repo if you need the whole source code.
See you all soon on another project