CI/CD Project of a Node.js App with GitHub Jenkins, Docker Compose, Terraform, AWS VPC, EC2

Proficient and skilled Cloud and DevOps Engineer with 6+ years of hands-on experience Cloud Infra, automating, orchestrating end to end Containerized application deployment in Cloud environment (Azure, AWS) , with Docker, Kubernetes, Ansible, Terraform IAC, Jenkins CI/CD, and DevOps methodologies and Automating Cloud solutions with Boto3 and Architecting cloud service based solutions
Project Description:
Hello friends, today I am going to share a CI/CD project for a Node.JS Application using Jenkins Declarative Pipeline. It will fetch the code from the source code repo GitHub and then build the docker image and push it to the docker hub and Deploy the containerized application through the docker-swarm in the 2 different virtual servers(EC2 Instances) which will be hosted in a VPC of AWS Cloud. And that Cloud Infrastructure will be created not manually but by Terraform.
Sound's great !? then let's get started.
Prerequisite:
We will need a basic knowledge of DevOps CI/CD principles and also tools knowledge as below -
Git, GitHub
Docker & Docker Swarm
Jenkins
Terraform
AWS VPC
AWS EC2
Linux Command Line
and also need some of the tools installed and account in some repositories(DockerHub, GitHub, AWS Console) in your local system like
AWS CLI
Terraform
Jenkins
VS Code
Git
GitHub - Project Link:
link - https://github.com/jaydeepdutta95/CICD-Project-1-Node-Js-App
You can fork this repo for practicing purposes.
Steps:
So let's understand the steps first and then do some hands-on.
Source code management with git hub, Push our code to GitHub from local for a Node JS app. If you don't have any code, don't worry I will share all of the code.
AWS CLI Configuration
Build Terraform Configuration code for AWS Cloud - A VPC with 2 public and one Private subnet and EC2 instances with user data to install the Java JDK, Docker, and Docker Swarm (during the creation of Instances). So that we don't have to install it after launching the instances.
Deploy the Infrastructure in the AWS with help of Terraform from the local
Jenkins Agent installation in the remote EC2 instances and configuring with SSH keys
Build Docker file and Docker-Compose file
Build the Jenkins Declarative Pipeline Script to automate the CI/CD pipeline Build, Test, Deliver and Deployment
Create a Jenkins Pipeline Job for the CI/CD pipeline
Validation of Deployent
Steps 1 and 2: Source Code management and AWS CLI configuration
Let me assume you have a source code in your local and you have pushed to a GitHub account in a repository
If you don't have any please fork my repo
link - https://github.com/jaydeepdutta95/CICD-Project-1-Node-Js-App
Now you have your Code and all dependencies now let's configure AWS CLI in a minute.
Step 2:
- before heading to step 2 create an IAM User with (administrative Acess )in AWS and store the credentials Access and Secret Acess Key. We will need that to configure AWS CLI for Terraform accessing the Cloud.
Go to the AWS Console and create one IAM user as below

next click on Users button and create as shown step by step here

Type a name and choose permissions as below


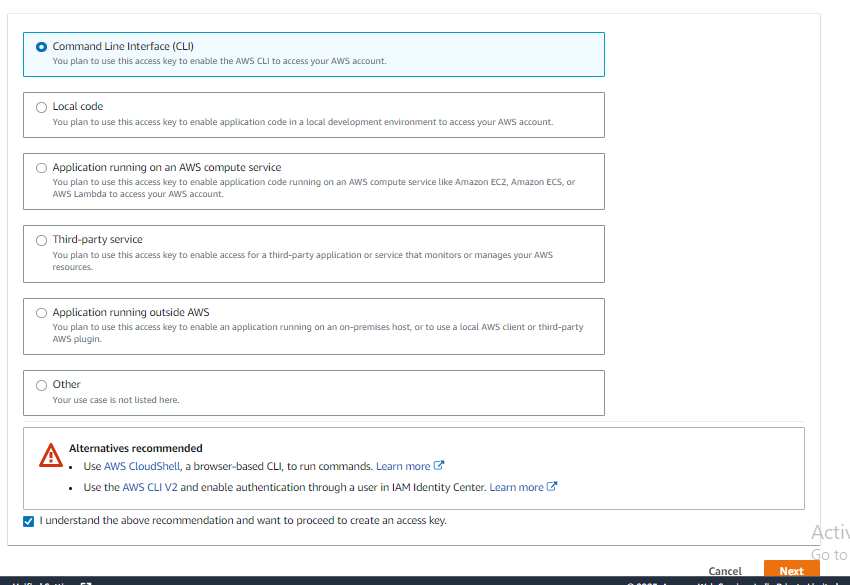
Choose the CLI options
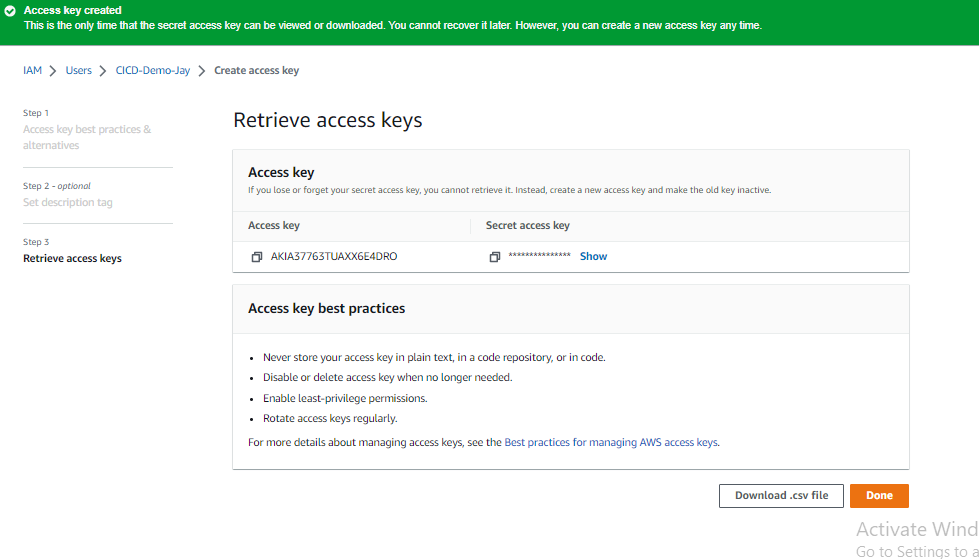
After clicking next you will get an option to create and then download the CS file which will have AWS User credentials
Now go to your Command Prompt / Terminal. and Assuming that you have AWS CLI installed already.
Type aws configure and put the credentials as required and the default region and output format(JSON or None)
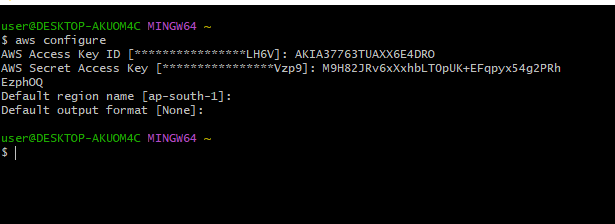
Now your System is ready to talk to the AWS console without going there in the console.
Step 3 & 4: WritingTerraform Configuration code and deploying in Cloud
To deploy our infra we can do it manually in AWS but with help of Terraform, it will be easy here.
Code consists of one VPC, two subnets and 2 EC2 instances as Jenkins Agent with pre-installed Java, Docker and docker-compose.
Code Git hub link
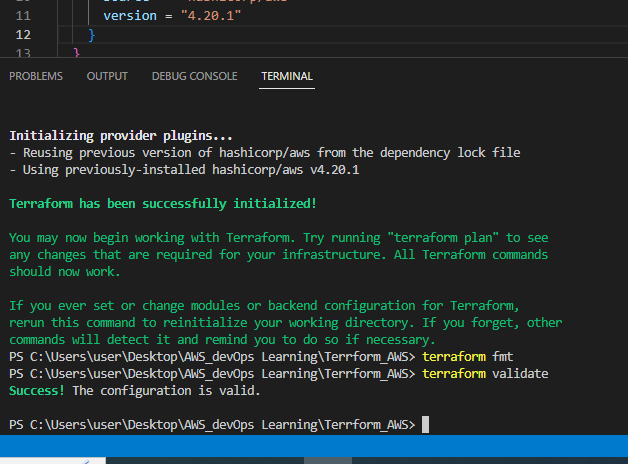
Deploy the Code - now in the terminal where the Terraform folder is and in the terminal type these below commands one at a time
terraform init- it will init the terraform in the background in that folderterraform fmt- it will format the code if any wrong indentation is thereterraform validate- to check if the code is valid ( its a process to de-bug your terraform code before applying)terraform plan- if no issue there type this and you will see how many resources are going to addterraform apply- finally, we will apply and roll out the infra in aws by this last command. it will ask for a prompt, and for that, you have to type yes.
check the below imagaes for ref;

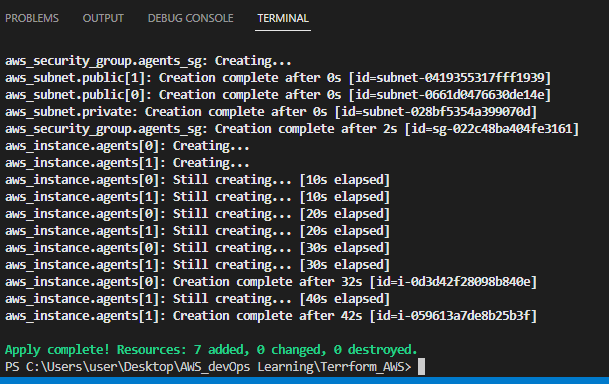
Now we have successfully deployed our code in Cloud.
we can check if infra is correctly deployed in AWS lie below.

Step 5: Jenkins Agent installation.
for that first, we have to log in to two newly created instances through the pem file from our local terminal or you can use any SSH agent. and after the login we will check if our instances are configured correctly or not, will check whether Java, docker and Docker compose is installed or not properly.
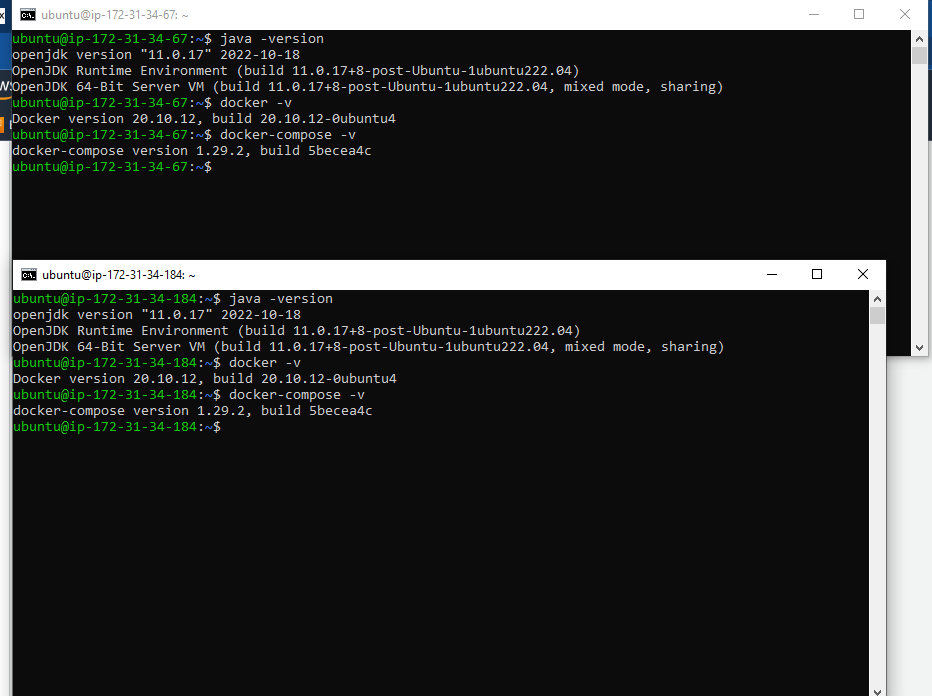
So now we can see all the software installed perfectly as we wished.
now we have to install Jenkins agent in each instance and configure it with our local Jenkins server. for that, we will go step by step
first make sure master and agent server has same java version otherwise it will create problems
we will create the ssh key in two parts ( public and private) and we will keep it private in our local machine and private will be kept remote(agent machine). So for that, we will type in the local cmd line type
ssh-keygenlike below and thencd .sshyou will find two type of keys generated.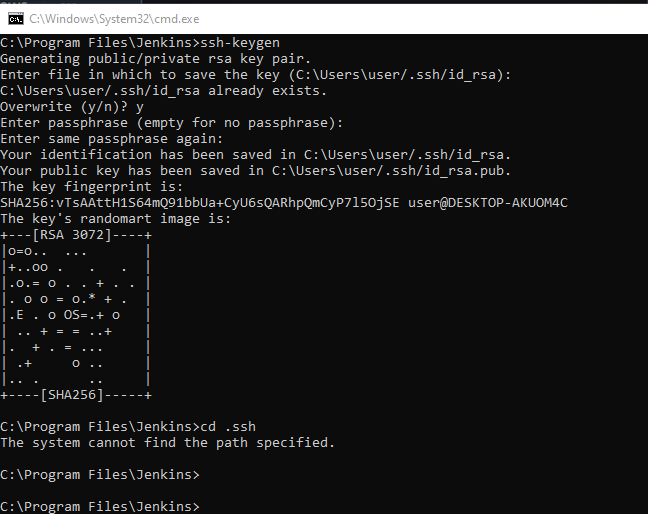
Ok thats done, now you will take the public key
cd .sshcat id_rsa.pubcopy the public key and go to your remote machine in .ssh folder under the file authorized_keys
cd .sshvi authorized_keyspaste your pvt key under the pem file key and save and exit like
esc+:wq+enter
* **do these steps for both agents**

now your servers are connected internally now to configure in jenkins side we have to add agents in Node section of anage Jenkins section.
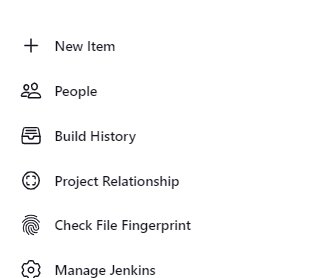
go to Jenkins Dashboard and then > manage Jenkins > Manage Nodes and Clouds > click on +New Node as below

then create as below add name, descriptions, label (grouping of agents) host = ip of your remote machine (public ipV6) and add with credentials and we will add them during the node creations.

now we need to add credentials in Jenkins credential book for SSH pvt key to ssh through your remote machine. Kind will be SSH username with Private Key, Choose a id and Desc ( arbitrary but meaningful) and paste the Pvt key (we have generated by
ssh-keygenin this Pvt key section. (cant show the pvt key adding due to privacy issue)
now if all is done then come back to agent adding page and choose the recent credentials (we have created ) and save and create agent 1 and 2
how to make sure agents are connected correctly - by visiting the Nodes page if we see that Jenkins can fetch info about our agent machine, free memory, and left memory then we can ensure agents are connected. also, we can check the new agents log also. as below. if your servers are offline then it will show a red cross mark beside the agent name.


now we have completed the 5th step (which was a biggy). Now we are about to write the final config files for Docker and Docker-Compose then Jenkinsfile (declarative pipeline)
Step 6: Build a Dockerfile and Docker-Compose file
Now we will write the Dockerfile and Docker-compose file as below
FROM node:10-alpine

WORKDIR /home/node/app

COPY . /home/node/app

RUN npm i

RUN npm run test

EXPOSE 8000

CMD [ "node", "app.js" ]
Now in this Dockerfile
we have pulled a base image of Node
next, we have created a Work Directory
next, we have copied all the files in the Dockerfile in the working directory( if you want you can specify your copy to work dir, only copy what you need)
next, we have to run commands like
npm install(i)andnpm run testto install and test our code dependencies.after that, we exposed port 8000 for our app in the container (as the Node app is running on port 8000) and run compile command
node app.jsbut by default CMD in the Docker file will take space as input so we have to split it asCMD [ "node", "app.js" ]
Next, we have to write the Docker-compose file.
version: '3.9'

services:
  web:
    image: 'jaydeep007docker/my-node-app:latest'
    ports:
      - "8000:8000"
Note:
Docker-compose file written in YAML syntax.
first, we have to specify the version of docker-compose and need to specify docker services. We are about to run one container so we are creating only one service here with specs like Name as web and image source and ports.
You may think why we need docker-compose when we can run the container with the
docker runcommand. The answer is using docker-compose is a better practice when you will need to handle multiple containers than within one config file like the Docker-Compose file you need to specify the services only the rest all be taken care of by Docker-compose.
Now we have to write the last config file for Jenkinsfile
Step 7: Build the Jenkins Declarative Pipeline Script to automate the CI/CD
we will write a Jenkinsfile - Declarative pipeline for 5 stage
SCM checkout
Build the sourcecode
Test
Push the Docker image to docker hub
Parallel Deployment in agents
Deployment in agent1
Deployment in agent 2
pipeline {
    agent any
    stages{
        stage('Code'){
            steps{
                git url: 'https://github.com/jaydeepdutta95/CICD-Project-1-Node-Js-App.git', branch: 'main'
            }
        }
        stage('Build and Test') {
            agent { label 'agent1'
            }
            steps{
                sh 'docker build . -t jaydeep007docker/my-node-app:latest'
            }
        }
        stage('Push') {
            agent { label 'agent1'
            }
            steps{
                withCredentials([usernamePassword(credentialsId: 'MyDockerHub', passwordVariable: 'dockerHubPassword', usernameVariable: 'dockerHubUser')]) {
                 sh "docker login -u ${env.dockerHubUser} -p ${env.dockerHubPassword}"
                 sh 'docker push jaydeep007docker/my-node-app:latest'
                }
            }
        }
        stage ('Deployment') {
        parallel  {stage('Deploy in agent1') {
            agent { label 'agent1' }
            steps{
                sh "docker-compose down && docker-compose up -d"
            }
        }
                  stage('Deploy in agent2'){
            agent { label 'agent2' }
            steps{
                sh "docker-compose down && docker-compose up -d"
            }
        }
       }
      }
    }
}
Note -
make sure you have added your Dockerhub Credential in the Jenkins Credentials manager with an ID and replace my "MyDockerHub" with your Jenkins Credentials ID.
Here we have deployed our App on two servers using the Jenkins Master Slave technique. You can use this technology for a dedicated job run one agent is dedicated for testing purposes, and another agent is dedicated for building purposes.
Here we have deployed the App parallelly in two servers. The benefit is if one server has any problem then another deployment will run means your total pipeline will not get stuck for one particular job, in case of any problem in a parallel job, Pipeline will bypass another job. That's the beauty of parallelism of Jenkins.
Step 8: Create a Jenkins Pipeline job
to do this we need to go, to Jenkins, Dashboard and create a pipeline job and Specify the SCM repository. then start building. like below
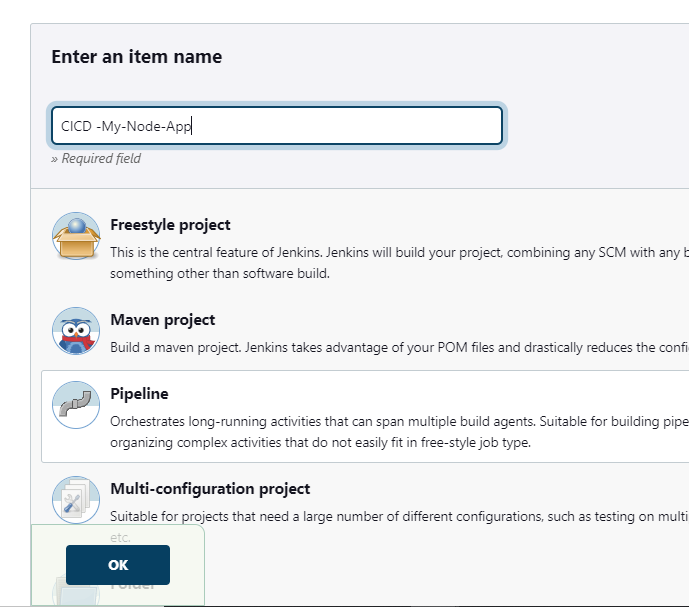
- First click on New Item
Next, provide a meaningful name and choose the type as Pipeline and save it as below.
Choose Script location as SCM and provide your git project/repository https URL.
(if your repository is private then you have to specify the credentials in Jenkins otherwise pipeline will get fail at starting)

After saving the pipeline click on Build now and see the Pipeline executes successfully. if any error tries to fix it. I have got an error as my docker-compose file was not updated in git repo so the deployment stage failed.
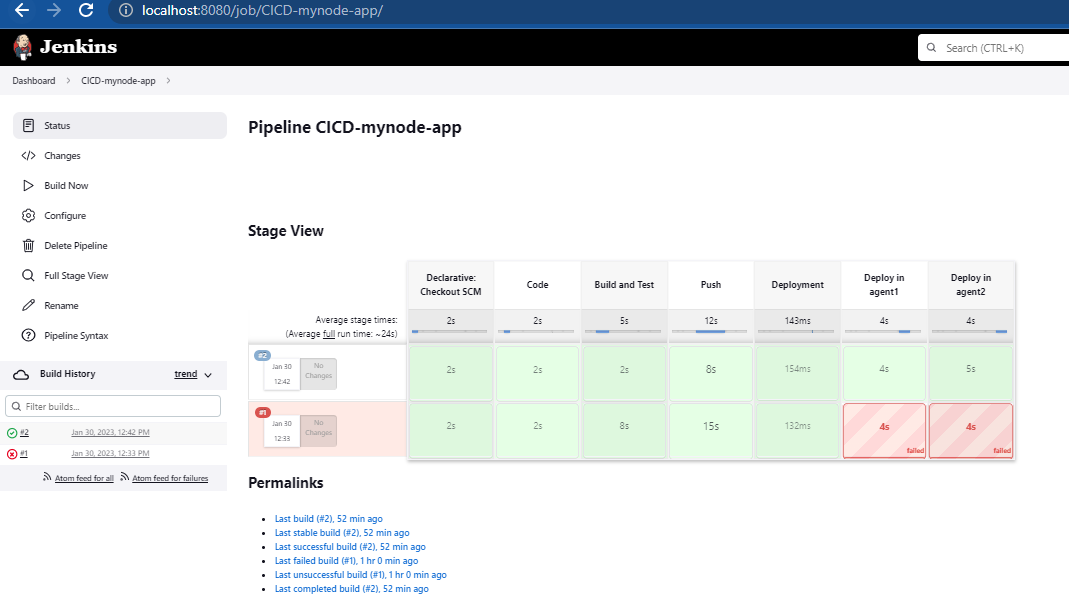
After fixing the error our pipeline successfully ran and Deployment is done in two servers, Now its time to Validate our Deployment.
Step 9: Validation of Deployment
We have now deployed our app and the app is running in port 8000 but in our EC2 instance we have not opened a port for 8000 so we cant validate right now, so firstly we have to manually open port for 8000 from Security Group inbound rule by configuring and allowing TCP connection for port 8000 from anywhere IPV4.
Configure the SG inbound rule for two instances like below:

Now open a new window of your browser and type <EC2 instcane Agent1 public IP>:8000. now you can see your App is now deployed on a virtual server sucessfully .

this is deployed in first agent

And this is Deployed in agent2
Thank You and Hurray!
We have successfully deployed our App in two different servers at the same time using Jenkins, Docker, Docker-Compose, Terraform, AWS
If you have liked this project and my effort please share this and fork my Github repo for more practice.


