Git, GitHub Basic with 15 Important Git Commands & Hands-on
Git and Git Hub Basics

Proficient and skilled Cloud and DevOps Engineer with 6+ years of hands-on experience Cloud Infra, automating, orchestrating end to end Containerized application deployment in Cloud environment (Azure, AWS) , with Docker, Kubernetes, Ansible, Terraform IAC, Jenkins CI/CD, and DevOps methodologies and Automating Cloud solutions with Boto3 and Architecting cloud service based solutions
before jumping into the discussion of Git and GitHub let's understand the basics of Version Control is, cause it's all about the Source code management and version control
What's Version Control?
What do you think about the naming convention? after hearing "Version Control"
Version control is a method, not software. Version Control is to keep track of all the changes that you have made in your code or any files. Let's understand by a simple Example
Let's say you have a file/code for your application. Now someday, you want to do a modification in that code and republish the code and rebuild the application. Now once you have done the modification of the code, launch the newer version of it. like Whatsapp, Facebook always updates its version.
Now when you only write code it's easy to keep track sometime but when multiple developers are writing code and need to be merged into one single code, then it requires Versioning and controlling that.
By now you have got an Idea of what I am trying to say. Yes, to keep track of all the versions you have made you need to know the version control mechanism and for that, we need to understand Git and GitHub (there are other tools such as BitBucket same as GitHub). Cause Git will do that - Version Control is done locally and GitHub will do it remotely so with help of Git you can easily revert or reset all the changes that you made to the source code.
Now let's understand what Git and GitHub is
What is Git?
Git is a simple software that is commonly used as a version control system. In simple words, Git tracks all the changes that you and your team made to the files or codes. and enable the versioning of your files and codes once you and your friends did any smallest modification. And thus Git makes collaboration easier, allowing changes by multiple people to all to be merged into one source.
So regardless of whether you write code that only you will see, or work as part of a team, Git will be useful for you. So learning the Git mechanism is very important and it's easy to learn actually.
Git has a three-tier architecture
Working directory - it's your folder on local system where your files/codes are stored,
Staging area it's a virtual space in git software where those files are present that you want to send to commit(to create a snapshot of files),
After commit is fired, files which are in staging area will move to Git Repository.

Now let's start with Git Hub. But before that let me show a difference, and you may get an idea of what GitHub is.

any Idea ???? No problem you will get it in a minute.
What's the GitHub?
There are a lot of people asking "What is GitHub?" online. There are over 615 million responses to that query on Google. It's a popular name in the tech space, even if you’re not a developer (yet).
GitHub is an online software development platform. It's used for storing, tracking, and collaborating on software projects. In Simple words, It's like your Google Drive but there is a slight difference technically. You can store photo, files, many more but the Software industry don't do that to GitHub
GitHub is one of the most popular resources for developers to store/ share code and work on projects together. It’s free, easy to use, and has become central in the movement toward open-source software.
You write code in Python and you want to share that with your friends. Yes you can do it in so many ways but one of the best ways is to upload it to GitHub and share the repository link (similar to your drive folder links)
How does it work?
users create accounts in GitHub, upload files, and create coding projects. But the real work of GitHub happens when users begin to collaborate.
While anyone can code independently, teams of people build most development projects. Sometimes these teams are all in one place at once time, but more often they work asynchronously. There are many challenges to creating collaborative projects with distributed teams. GitHub makes this process much simpler in a few different ways.
Difference between Git and GitHub:
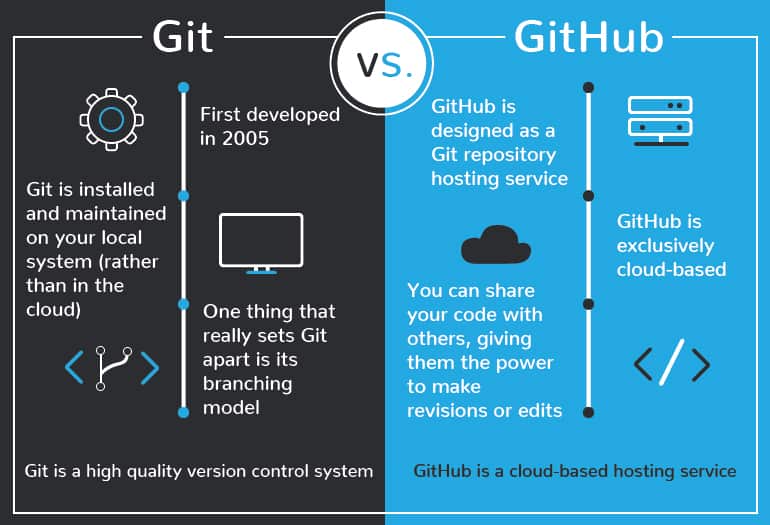
Hope you get an Idea now. While Git is a tool ( installed in a local host) that's used to manage multiple versions of source code that are then transferred to files in a Git repository, GitHub serves as an online location for uploading copies of a Git repository. But, there's no comparison when it comes to Git vs. GitHub as far as their function.
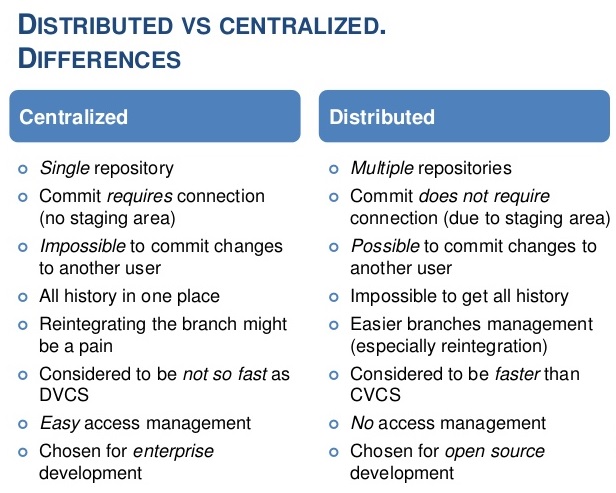
Type of Version Control System
In the source control management world, Version Control comes in two variations – the one the old and the trending one. Centralized version control system and distributed version control system (new one)
Let's understand the difference between the actual theory
The main difference between centralized and distributed version control is that, in centralized version control, the versions are saved in the remote repository, while in distributed version control, versions can be saved in the remote repository as well as in local repositories of the local machines.
for a better understanding, you can read this
15 Important Git Commands - Daily use
so let's have a list of Git Basic Commands and implement it by doing hands-on.
Basic Commands of Git
git init - this is the starting command to initialize the git software in your folder/directory. ex -
git innitgit add - to add the file in the staging area we have to use this like
git add <filename>orgit add .by the dot you mean "hey git add all the files in your staging area", dot means all files here.git status - to check if we have successfully added the files to the git staging area. Syntax -
git status. You can type it after initializing the git to check like red-marked files are not staged and green-marked files are staged alreadygit commit - to add the files in the Git Repo that already got staged and syntax like
git commit -m "this is the first commit"-m indicates the commit message and make sure always use the meaning full commit message.whatever you do in git, git will generate a unique commit-id, Git says it's a hash id by which git tracks all the history.
git log - to check the current log how many commits you have done in locally
you can type
git logorgit log --oneline"--oneline" will show with commit id and in a single-line format.git revert - to revert the last commit. If you think that the latest commit is wrong and wants to go back to the previous version. syntax -
git revert <commit_id>git reset - this command is used when you want to go back to one or more versions ago. Let's say if you have done 6 updates and you want your 2nd version back in track use git reset up to the 2nd commit. Syntax -
git reset <target_previous_commit_id>git checkout - to checkout to another branch and this command can be used to create a new branch.
Syntax -
git checkout <branch_name>to move to another branchand
git checkout -b <new_branch_name>to create a new branchgit branch - to check the current branch you are in. Syntax -
git branchgit merge - let's say your main code is in the master branch and to add some feature you created a virtual copy in a new branch you did some modifications after a few commits and want to add this feature to the master branch then we will use the
git merge <branch_name>we will do that by going to the desired branch (like Master in local) and wants to add the feature branch's last commit to our master we will first dogit checkout masterthengit merge feature_Newand if now you will see
git log --onelineyou can see the HEAD pointer pointing to the same commit id for both branches.git rebase - rebasing is another way to add the new features you had made in the feature branch but unlike adding only the last commit of the feature branch to the master this will add all the commit history in front of the master branch.
the syntax is the same as git merge only to replace the word merge with rebase.
Now check the - difference between rebase and merge.
git fetch - it is used to bring info/status about our remote repo to check whether there is any change in the repository wrt. to your local. if we see any changes remotely and want to apply the same update locally then we will use first
git fetchand thengit mergeto merge the new changes with the local.git pull - it is used to get updates from the remote(GitHub) repo. This command is a combination of git fetch and git merge which means that, when we use git pull, it gets the updates from the remote repository (git fetch) and immediately applies the latest changes in your local (git merge).
Now check the - Differences between git fetch and git pull
git push - to update the remote repo from the local machine we use this command. In simple words if you have updated something locally then you want to merge the same update with your remote repo then Git push uploads your commits to the remote repository. Syntax -
git push <remote> <branch-name>if your branch is newly created, then you also need to upload the branch with the following command:
git push --set-upstream <remote> <name-of-your-branch>or
git push -u origin <branch_name>git clone - this is a command for downloading existing source code from a remote repository. Git clone makes a xerox copy of the latest version of a project/repo in a repository and saves its local machine.
Now it's time to get your hands dirty. We will do some easy hands-on now
Prerequisite
you need to have git installed on your machine and
A GitHub account
Git Installation & Git Hub account Opening
Hope you got an idea of Git and GitHub and the git commands. So let's install Git on your local machine & open a Git Hub account
Links for
Hands-on
Hope you have now installed the git in your local system and already opened a git hub account. if so then let's get started in this hands-on part
now we will see some examples - so I go to my respective folder from where I want to store file/files to the git repo. so I type git innit (if this is the first time in the folder git will show you some basic messages) and then git add . to add all the files in the git staging area. And then git commit -m "customized message" and after that check the history with git log
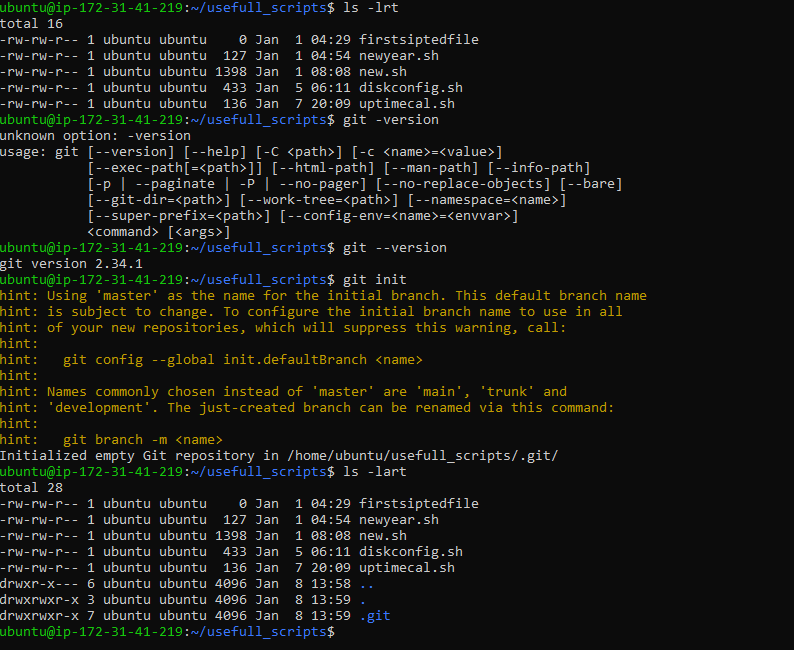
after initializing git I added one file and the rest are shown as red as they are not staged yet in the below image then I added all files and then all are marked as green

after that, I did commit as below and see there is a HEAD which indicates where your branch is (means in which commit), by default in local git use the master branch.

after this, I updated the files by adding some new lines and I did a few commits like the below and then
I thought to revert one commit cause of something I have written wrong in my file. so I did it git revert <commit id>

once you enter the git revert command it will open a file in the nano editor you just need to save and exit the file and after that check, the git log to check the latest commit is reverted (check the bottom position in the above image)
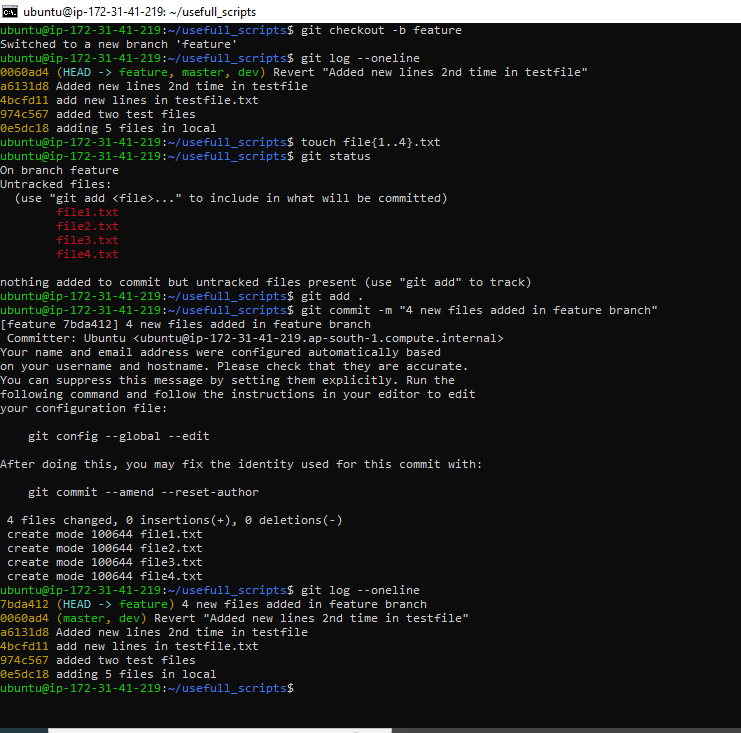
now let's do hands-on with the git branch, git checkout, git merge and git rebase
to understand this let's do create two new branch called feature and Dev (from master ) and switch to the feat branch by git checkout command and add files in that and then add new lines in those files and commit those changes.
now we will check the git log, it will show that Master and Dev at the same stage but the feature branch goes ahead of one extra commit.
and now we want to have the latest commit to merge with Dev and then Master. So we will merge the update with the Dev branch with git merge and later we will update all with Master with all the commits by using the git rebase command. by this, we will rebase the commits of Dev once again in front of the Master branch.
creating new branches and do commits in those
2. merging feature (first switch to feature and then type git merge dev )with Dev and rebasing then with master. and keep cheking git log for better understanding.


Now we will see the git push and git pull
now from our local first we will push the code to the remote repo and then make some changes there and then we will pull that changes to our local. so let's do by step by step.
first, create a repo on GitHub and from the local machine run this steps/ commands
git initto initializegit add <file_name>git commit -m "your commit message"git config --global user.name "your_git_hub_username"(your git hub id) - before pushing to the online repo configuration of your account is required.git config --global user.email "abc@xyz.com"(your git hub account emailid)git branch -M main(in remote default branch is main like in local that is master)git remote add origin <https://your_repo_link>this command to add remote repo linked to localgit push -u origin mainto push the changes to remote repo from localand after that add some changes in the remote repo like adding some lines in files or creating new files. (I have the done the 2nd option)
then to merge and update the local you need to type the next command
git pull <https://your_repo_link>- creating repo -

* 2\. Doing the steps - first we will push and then we will pull


Ending the Discussion//
Hope you have liked this blog. Please hit a like and follow me for more updates like this. I will try to post more blogs on DevOps fundamentals and projects that I have done.
Thanks all and bye .. see you in a next blog


